The CV1.2, one of the cvgtElements range of DIY circuits, is available and its data pack is ready to view/download on the support page. CV1.2 is ready built and tested, you have to DIY them into your own modules/panels.
CV1.2 takes a Euro 1V/octave CV and translates it into a Buchla 1.2V/octave CV - ideal if you want to take a Euro pitch CV into the Music Easel's pitch KEYBOARD CONNECTION
The
GTPulse datapack is also available to view/download on the support
page.
The online home for my synth projects, ideas and Synovatron products.
Showing posts with label DIY. Show all posts
Saturday, 13 June 2015
New Euro to Buchla CV Translator - CV1.2
Labels:
analog,
analogue,
Buchla,
CV1.2,
CVGT1,
cvgtElements,
cvgtMM,
DIY,
eurorack,
Format Jumbler,
GTPulse,
modular,
module,
PCB,
synovatron,
synth,
synthesiser,
synthesizer,
Translator
Saturday, 8 November 2014
Custom Half-width Buchla Modules
I was asked to design and build a pair of custom half-width Buchla modules for some clients. They each had two half-width slots spare in their custom built cases and wanted to fill the spaces with Euro to Buchla CV and gate translator modules.
The brief was simple (and the same for both clients): 5 channels of 1V/oct to 1.2V/oct CV translation and 5 channels of gate boosting to Buchla levels; the Buchla stepped pulse was not required, just big pulses (10V or more).
This was a great opportunity to use the Synovatron Proto range of prototyping boards which accomodate 5 channels and offer stackability if more circuitry is required than will fit on one board; see below.
As the Proto boards are designed primarily for Euro there was space on the 4U Buchla front panels to add some extras in the form of a passive attenuator. Here are the front panel designs that we agreed on:-
To keep costs down it was decided not to have panel marking as the functions are obvious.
The CV module design used a straightforward precision amplifier with gain of 1.2000 (yes that accurate), 1M Ohm input and 0 Ohm output impedances. The gate module used comparators and output and LED drivers. The outputs each have diodes in series allowing them to be wire-ORed by just connecting outputs together (common to Buchla, wish it was used on Euro).
The CV module electronics fitted nicely on a ProtoJax board with plenty of space as you can see:-
For the gate module I decided to put the input comparators and sockets on the ProtoJax board and output buffers and LEDs on the ProtoXp board and stack them together (it probably could all have been put on one board but it was simpler to make use of the space). The stacked ProtoJax and ProtoXp boards can be seen here:-
The gate board was powered from an MTA connector and the CV board took its power from the gate module (hence the 10-pin ribbon headers for a linking ribbon cable); this was at the client's request as they only had one spare connector (these are very low current modules and daisy chaining them didn't cause any crosstalk issues).
The finished panels looked pretty good; they were made by Schaeffer using Front Panel Designer http://www.schaeffer-ag.de/en/front_panel_designer/the_idea/.
If you are interested in the Proto range of PCBs or in having a custom module built then please contact me at synovatron@btinternet.com
The brief was simple (and the same for both clients): 5 channels of 1V/oct to 1.2V/oct CV translation and 5 channels of gate boosting to Buchla levels; the Buchla stepped pulse was not required, just big pulses (10V or more).
This was a great opportunity to use the Synovatron Proto range of prototyping boards which accomodate 5 channels and offer stackability if more circuitry is required than will fit on one board; see below.
![]() |
| The Proto range of boards |
| CV and Gate modules |
The CV module design used a straightforward precision amplifier with gain of 1.2000 (yes that accurate), 1M Ohm input and 0 Ohm output impedances. The gate module used comparators and output and LED drivers. The outputs each have diodes in series allowing them to be wire-ORed by just connecting outputs together (common to Buchla, wish it was used on Euro).
The CV module electronics fitted nicely on a ProtoJax board with plenty of space as you can see:-
For the gate module I decided to put the input comparators and sockets on the ProtoJax board and output buffers and LEDs on the ProtoXp board and stack them together (it probably could all have been put on one board but it was simpler to make use of the space). The stacked ProtoJax and ProtoXp boards can be seen here:-
The gate board was powered from an MTA connector and the CV board took its power from the gate module (hence the 10-pin ribbon headers for a linking ribbon cable); this was at the client's request as they only had one spare connector (these are very low current modules and daisy chaining them didn't cause any crosstalk issues).
The finished panels looked pretty good; they were made by Schaeffer using Front Panel Designer http://www.schaeffer-ag.de/en/front_panel_designer/the_idea/.
If you are interested in the Proto range of PCBs or in having a custom module built then please contact me at synovatron@btinternet.com
Labels:
Buchla,
CVGT1,
cvgtMM,
DIY,
eurorack,
front panel,
jack socket,
modular,
module,
PCB,
prototype,
Prototyping,
schaeffer,
synth,
synthesiser,
synthesizer,
Translator
Saturday, 13 September 2014
5 into 1 Analogue Systems to Doepfer Bus Adaptor/Expander
The new 5ASM2DB Analogue Systems Module to Doepfer A-100 Bus Adaptor/Expander is now in stock and available to order.
SchneidersLaden have stock of 5ASM2DB which can be ordered from their website at http://www.schneidersladen.de/en/manufacturer/synovatron.html.
For DIY enthusiasts it is also available as a kit or as a bare PCB direct from Synovatron (please email synovatron@btinternet.com).
The 5ASM2DB offers five Analogue Systems sockets on one small circuit board with low-current LED indicators to show that ±12V and +5V power is available. It comes with a ribbon cable to connect to the A-100 bus and four self-adhesive nylon PCB mounting pillars (you can of course use screwed in pillars so a drilling template will be provided).
If you have several Analogue Systems modules in a Euro rack then the 5ASM2DB could be a better alternative to using several ASM2DB Adaptors because it expands the bus and frees up A-100 Bus connectors for Euro modules; it costs roughly the same as three ASM2DB Adaptors. ASM2DB and DM2ASB Adaptors are still available.
SchneidersLaden have stock of 5ASM2DB which can be ordered from their website at http://www.schneidersladen.de/en/manufacturer/synovatron.html.
For DIY enthusiasts it is also available as a kit or as a bare PCB direct from Synovatron (please email synovatron@btinternet.com).
The 5ASM2DB offers five Analogue Systems sockets on one small circuit board with low-current LED indicators to show that ±12V and +5V power is available. It comes with a ribbon cable to connect to the A-100 bus and four self-adhesive nylon PCB mounting pillars (you can of course use screwed in pillars so a drilling template will be provided).
If you have several Analogue Systems modules in a Euro rack then the 5ASM2DB could be a better alternative to using several ASM2DB Adaptors because it expands the bus and frees up A-100 Bus connectors for Euro modules; it costs roughly the same as three ASM2DB Adaptors. ASM2DB and DM2ASB Adaptors are still available.
![]() |
| 5ASM2DB Adaptor/Expander |
![]() |
| 5ASM2DB Adaptor/Expander |
![]() |
| 5ASM2DB DIY Kit |
Labels:
5ASM2DB,
Adaptor,
Analogue Systems,
ASM2DB,
DIY,
Doepfer,
eurorack,
kit,
modular,
module,
PCB,
ribbon cable,
synovatron,
Thonk
Friday, 29 August 2014
New product preview
This is a design that has been hanging around for over a year in a 95% complete state but I have now taken the bold step of finishing it and going into production. It is called the 5ASM2DB and is a 5 socket version of the popular ASM2DB Analogue Systems module to Doepfer bus Adaptor. It is fabricated on a small circuit board and has 3 LEDs that indicate the presence of ±12V and +5V. The 5ASM2DB will be supplied with 4 self-adhesive nylon mounting pillars and a short ribbon cable so it can be placed adjacent to a busboard and linked via the ribbon cable (standard Euro rack 16 pin cable). It is not recommended for use with the Analogue Systems RS-370 as this draws a whoppng 680mA from the 5V rail.
It will be priced at roughly that of 3 ASM2DB Adaptors so the aim is you get 5 for the price of 3; which will be of interest to those of you with many Analogue Systems modules to go in a Eurorack case.
Availability is from mid-September and will also be available as a DIY kit and as a bare PCB for the more adventurous DIYers. Here's an image from the CAD package - it will not be red BTW!
It will be priced at roughly that of 3 ASM2DB Adaptors so the aim is you get 5 for the price of 3; which will be of interest to those of you with many Analogue Systems modules to go in a Eurorack case.
Availability is from mid-September and will also be available as a DIY kit and as a bare PCB for the more adventurous DIYers. Here's an image from the CAD package - it will not be red BTW!
Labels:
Adaptor,
Analogue Systems,
ASM2DB,
DIY,
Doepfer,
eurorack,
kit,
modular,
module,
PCB,
ribbon cable,
synovatron,
Thonk
Saturday, 12 July 2014
Eurorack DIY Prototyping Cards Rethink
Post updated 3rd July 2018
The Synovatron Eurorack DIY Kits have now been discontinued. Because many of the kit components are easily available from online retailers it made sense that Synovatron just provides the unique (e.g. PCBs) and harder to source parts (e.g. pot brackets). This provided a great opportunity to reassess the PCB designs rather than just reorder more of the same.
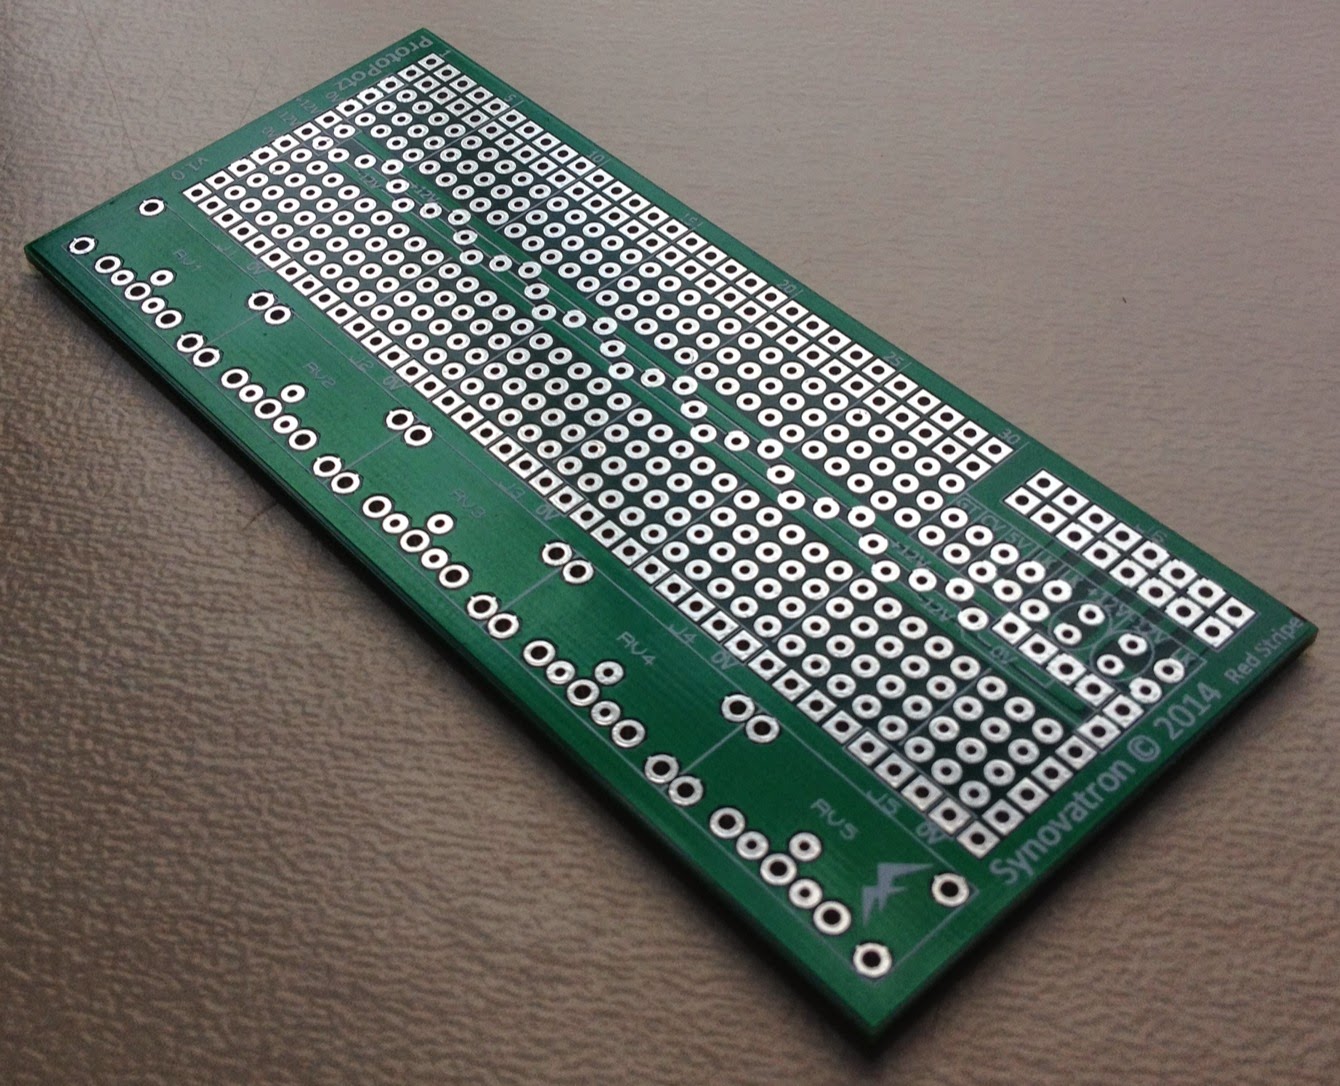
What has emerged is a revised and rebranded Eurorack prototyping solution that is more usable and more elegant than before. The revised product revolves around three PCBs in the Synovatron Proto series: ProtoPotz, ProtoJax and ProtoXp.
The new Proto PCBs' holes line up with each other to allow each board to be stacked one on the other using header plugs and sockets; allowing power and signals to be routed between boards without resorting to linking ribbon cables. Here is an example board stack-up:
Here is the range of pots available from Mouser that Synovatron recommends for use with ProtoPotz:-
The Synovatron Eurorack DIY Kits have now been discontinued. Because many of the kit components are easily available from online retailers it made sense that Synovatron just provides the unique (e.g. PCBs) and harder to source parts (e.g. pot brackets). This provided a great opportunity to reassess the PCB designs rather than just reorder more of the same.
What has emerged is a revised and rebranded Eurorack prototyping solution that is more usable and more elegant than before. The revised product revolves around three PCBs in the Synovatron Proto series: ProtoPotz, ProtoJax and ProtoXp.
The new Proto PCBs' holes line up with each other to allow each board to be stacked one on the other using header plugs and sockets; allowing power and signals to be routed between boards without resorting to linking ribbon cables. Here is an example board stack-up:
![]() |
| ProtoJax, ProtoPotz and ProtoXp boards stacked together |
![]() |
| Examples of headers and sockets used to stack the boards |
ProtoPotz
ProtoPotz is the direct replacement for DIY1 PCB (as used in DIY Kit 1 and DIY Kit 2). It is designed to hold up to five 16mm P160KN series pots using brackets. What's new about it?- Plated-through holes for robustness and convenience, essentially it's a double-sided PCB.
- Better supports the A-100 bus with dedicated positions for 10 or 16-way open or boxed headers, small electrolytic capacitors and protection diodes (to protect against reverse power connection.
![]() |
| ProtoPotz pot breadboard PCB |
ProtoJax
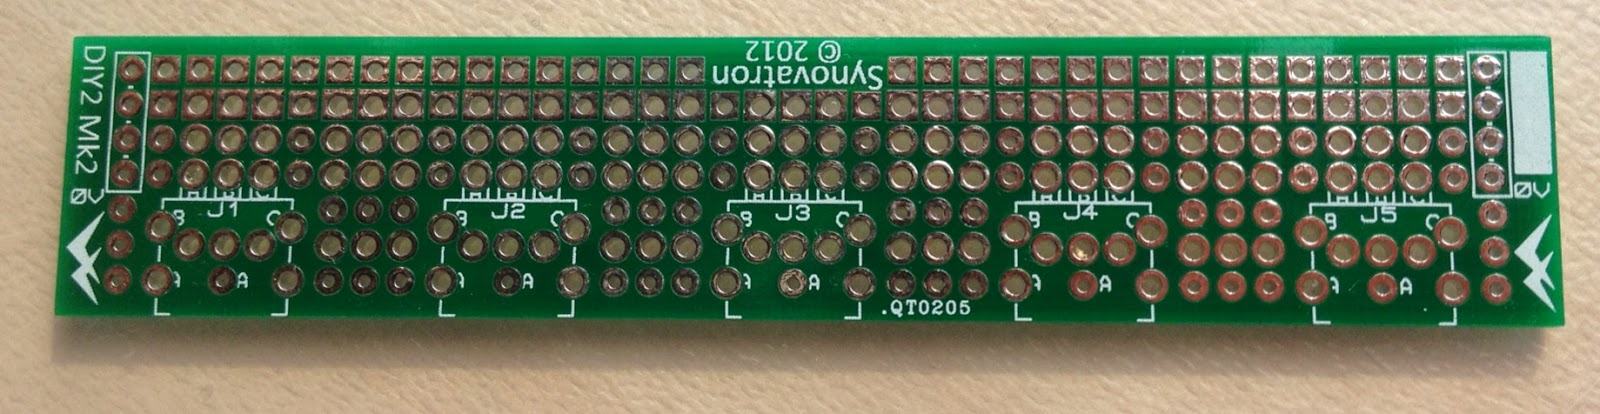
ProtoJax is an evolution of DIY2 and DIY3 PCBs. It is designed to hold up to five Cliff CL1384 3.5mm mono jacks. It is almost identical to ProtoPotz except it has footprints for jacks instead of pots and another two rows of breadboard holes. What makes it more advanced than DIY2 and DIY3 pcbs?- Larger breadboarding area.
- Supports the A-100 bus similar to ProtoPotz.
![]() |
| ProtoJax jack breadboard PCB |
ProtoXp
ProtoXp is a completely new PCB. It is an eXpansion board designed to add more breadboarding area to ProtoPotz or ProtoJax boards. It's features are:-- It has a cutout that allows the A-100 bus ribbon cable connector to fit without fouling on the ProtoXp board.
- The same ±12V power bus structure as the ProtoPotz or ProtoJax boards.
![]() | |
| ProtoXp expansion breadboard PCB |
![]() |
| DIY2 jack breadboard PCB |
![]() |
| DIY3 jack breadboard PCB |
Labels:
8HP,
CL1384,
Cliff,
DIY,
electronic,
eurorack,
jack socket,
kit,
modular,
module,
PCB,
prototype,
Prototyping,
ribbon cable,
synovatron,
synth,
synthesiser,
synthesizer
Tuesday, 1 October 2013
Another custom built Euro to Buchla Translator module
I was recently commissioned by a client to build a custom Euro Buchla interface module, similar to the two I previously built, but with offset switching. The previous two designs both had fixed offset and gain and were intended for use with envelopes, LFOs etc. In other words there was no 1V/octave to 1.2V/octave scaling required just offsetting to ensure the Euro signals stayed in the 0-10V range of the Buchla (you can refer back to my earlier post here).
This module is intended to be used alongside my client's CVGT1 module (which provides the ground reference connection) and adds more CV channels. My client uses Expert Sleepers' SilentWay software for pitch sensitive CV and was not interested in scale conversion as the software does the necessary recalibration however he also wanted the flexibility to be able to interface envelopes, transients and LFOs and so wanted to be able to DC shift signals when he needed to.
The spec was 4 channels of Euro to Buchla (scale of 1, 0V or +5V offset) and 1 channel of Buchla to Euro (scale of 1, 0V or -5V offset); so 10 connectors a 5 switches in 8HP.
My 8HP prototyping panels proved to be difficult as the existing hole positions meant that the connectors and switches would have been too close to each other plus I only had a few left and found they were scratched; they got binned. I used Schaeffer for a quick-turnaround panel; not cheap but very well made. In a moment of madness I got 5 panels made, including engraving (which the original 2 modules didn't have).
This module is intended to be used alongside my client's CVGT1 module (which provides the ground reference connection) and adds more CV channels. My client uses Expert Sleepers' SilentWay software for pitch sensitive CV and was not interested in scale conversion as the software does the necessary recalibration however he also wanted the flexibility to be able to interface envelopes, transients and LFOs and so wanted to be able to DC shift signals when he needed to.
The spec was 4 channels of Euro to Buchla (scale of 1, 0V or +5V offset) and 1 channel of Buchla to Euro (scale of 1, 0V or -5V offset); so 10 connectors a 5 switches in 8HP.
My 8HP prototyping panels proved to be difficult as the existing hole positions meant that the connectors and switches would have been too close to each other plus I only had a few left and found they were scratched; they got binned. I used Schaeffer for a quick-turnaround panel; not cheap but very well made. In a moment of madness I got 5 panels made, including engraving (which the original 2 modules didn't have).
Labels:
8HP,
analog,
analogue,
Buchla,
CVGT1,
DIY,
eurorack,
front panel,
modular,
module,
prototype,
Prototyping,
schaeffer,
synovatron,
synth,
synthesiser,
synthesizer
Tuesday, 10 April 2012
Euro to Buchla CV Interface Module
I was commissioned by a client to design and build an interface module that allowed his Euro synth to modulate his Buchla synth and vice-versa.
Format Jumbler?
Euro uses 3.5mm mini jack sockets and Buchla uses 4mm banana sockets (which are colour coded). However this design is not just a 'format jumbler' because aside from the connector differences the signal ranges are different. Buchla uses CV signals in the range of 0V to +10V and Euro uses nominally ±5V (well actually anywhere between -11ish Volts to +11ish Volts). My client wanted 4 channels of Euro to Buchla and 1 channel of Buchla to Euro.
Design Spec
The design spec I settled on was ±5V in (Euro) gives 0V to +10V out (Buchla) on channels 1 to 4 and 0V to +10V in (Buchla) gives ±5V out (Euro) on channel 5. As you can see the inputs and outputs both have 10V swings and so a gain of 1 is required but with a 5V offset (-5V one way and +5V the other). The input impedance of 100k and output impedance of 1k was used as it's fairly standard. I used clamping diodes on the Buchla outputs so that an input more negative than -5V didn't cause a negative output to the Buchla. Because there might not be a common ground reference between the two synths a GND socket was also added to the design. Note that Buchla colour coding uses black for CV outputs and ground connections, blue for CV inputs.
Implementation
As the job was for just one module I used one of my standard 8HP front panels (order code 8HPP) and a new DIY prototyping PCB (order code DIY3) to build the design onto.
The 8HPP front panel has 10 3mm pilot holes which had to be opened out to fit the 4mm and 3.5mm sockets plus a new hole for the GND socket. I settled on the position for the GND socket equidistant between the four lowest connectors really just for best spacing; I looked at putting it below the lowest two connectors but decided (incorrectly) that there would be not enough space to get fingers in and also avoid the mounting rail.
| 8HPJ (left) and 8HPP (right) Front Panels |
The DIY3 is a bigger version of the DIY2 prototyping board and allows more complex circuitry to be realised due to the larger breadboarding area, power rail support for op-amps and A-100 Bus support (it is effectively a hybrid between DIY1 and DIY2 boards). The idea behind DIY3 was to be able to do more with jack-socket only designs such as buffered mults and attenuators, amplifiers, logic and gate/trigger circuits etc.
![]() |
| DIY3 Prototyping Board |
The First Module
Here is the first module which I'm pleased with. It showcases the DIY prototyping board's capability nicely. The client was happy too.
The Second Module
On the back of the first order another client expressed an interest in the same functionality but preferred the GND socket to go below the lower two connectors. There was enough room to clear the mounting rail but pushes it closer to the channel 5 connectors than is ideal but still looks ok.
Further Modules?
I have another two expressions of interest for these modules especially if they were production rather than prototype versions. One suggestion was for front panel graphics to be added using the same font/style as Buchla which I like the idea of. Another thought is that not just CV translation is useful, gate/trigger translation would be useful too (as they are not compatible between the two 'standards'). I could also provide these as very basic kits (all the bits you need, a circuit diagram and a layout pattern). If I can get a few more interested parties to make it viable I would consider a small production run with purpose designed PCBs and a screen printed front panel. So if there is any interest out there please make your thoughts known to me.
Labels:
8HP,
analog,
analogue,
Buchla,
DIY,
eurorack,
kit,
modular,
module,
prototype,
Prototyping,
synovatron,
synth,
synthesiser,
synthesizer
Tuesday, 22 November 2011
Modular in a tool case
I had a day free on Saturday and set about putting a modular in a tool case. To be exact it is a Doepfer A-100 DIY kit #1 fitted to a Halfords engineers tool case. The point of this was to have an easily transportable demo system so I can take to shows, meets etc in order to show how lovely my CV Tools module is and to let people have a play.
In a follow-on to my cheap DIY store front panels post a few weeks back I used anodised aluminium angle strips in the construction from Homebase - the case is bigger than the 6U 84HP of the rack kit.
(Note to non-UK readers Halfords is a motor accessories store and Homebase is a DIY store)
Here's the case
Prep the case - remove separators, tool panel and unecessary fixings.
All done, ready to start serious modding
This will be powered by a 15VAC supply so a nice big hole for an XLR connector
XLR in place (EDIT: this is eventually replaced by a plug version as a power lead with exposed pins is bad karma)
A bit of judiscious foam cutting to neaten it up
Markout and drill the regulator boards fixing points - 4 x M3
Regulator screwed in place
I used M3 washers to spread the load - the case is just hardboard with a thin aluminium veneer
Position the bus boards and drill mounting holes - long M3 screws with tapped spacers fitted
All electrics now in place. Note this is temporary - there will be wiring to a front panel power switch on the next installment!
Next make the rack end pieces out of 10mm x 20mm anodised aluminium angle strip. These make the rack the perfect width to fit the case.
Similar to above I made top and bottom strips to fill the gap - I used 25mm x 25mm anodised angle, again an almost exact height fit - starting to look good.
Here's a view showing the fixings (ok I drilled a hole in the wrong place. Motto: measure twice, cut once!!!).
As I said a near perfect fit in the case. At this point just resting on the foam and not screwed in. That's in the next installment.
Loaded with modules and powered up. Take no notice of the modules selection, I've since changed it to a more coherent set.
Even a nifty scope showing VCOs, Synovatron DioDe and CV Tools in operation - now that's a waveform!
Next installment will add a power switch and fixings to anchor the rack to the case. It will also make use of all that front panel space top and bottom for passive and buffered mults, bus access, simple LFOs, gate logic, 3.5mm to 6.25mm/RCA adaptors, etc etc (the thought of the lovely goodies that will get built in is going to keep me awake a night - so sad!!)
Here's a short clip of it working:-
In a follow-on to my cheap DIY store front panels post a few weeks back I used anodised aluminium angle strips in the construction from Homebase - the case is bigger than the 6U 84HP of the rack kit.
(Note to non-UK readers Halfords is a motor accessories store and Homebase is a DIY store)
Here's the case
Prep the case - remove separators, tool panel and unecessary fixings.
All done, ready to start serious modding
This will be powered by a 15VAC supply so a nice big hole for an XLR connector
XLR in place (EDIT: this is eventually replaced by a plug version as a power lead with exposed pins is bad karma)
A bit of judiscious foam cutting to neaten it up
Markout and drill the regulator boards fixing points - 4 x M3
Regulator screwed in place
I used M3 washers to spread the load - the case is just hardboard with a thin aluminium veneer
Position the bus boards and drill mounting holes - long M3 screws with tapped spacers fitted
All electrics now in place. Note this is temporary - there will be wiring to a front panel power switch on the next installment!
Next make the rack end pieces out of 10mm x 20mm anodised aluminium angle strip. These make the rack the perfect width to fit the case.
Similar to above I made top and bottom strips to fill the gap - I used 25mm x 25mm anodised angle, again an almost exact height fit - starting to look good.
Here's a view showing the fixings (ok I drilled a hole in the wrong place. Motto: measure twice, cut once!!!).
As I said a near perfect fit in the case. At this point just resting on the foam and not screwed in. That's in the next installment.
Loaded with modules and powered up. Take no notice of the modules selection, I've since changed it to a more coherent set.
Even a nifty scope showing VCOs, Synovatron DioDe and CV Tools in operation - now that's a waveform!
Here's a short clip of it working:-
Labels:
CV Tools,
design,
DIY,
Doepfer,
eurorack,
front panel,
kit,
LFO,
Mixer,
modular,
module,
Mult,
synovatron,
synth,
synthesiser,
synthesizer
Monday, 24 October 2011
New file hosting for Synovatron Downloadable Documents
The latest Synovatron documents can be downloaded from these links following difficulties some people had with the Google Docs links.
The build info gives you a good idea of what is entailed in building the kit. Further build info (schematics and items list) is available when you place an order for the kit.
Friday, 8 July 2011
Cheap DIY front panels from UK DIY store!!!
Tone's Top Tip for July
Whilst wandering around my local Homebase DIY store I noticed a rack of metal and plastic extrusions. In there was a range of 2mm thick aluminium clear anodised strip in 10mm, 15mm, 20mm, 25mm and 30mm widths i.e. approximately 2HP, 3HP, 4HP, 5HP and 6HP respectively (note that the online links wrongly refer to it as flat tube and not all widths are listed online). The strips are 1m long and cost between £4.50 and £8.00 each. They have a similar finish to Doepfer front panels but with a slight vertical graining. Here's a pic of 6HP and 4HP strips.
Labels:
4HP,
DIY,
Doepfer,
eurorack,
front panel,
modular,
prototype,
synth,
synthesiser,
Tone's top tips
Tuesday, 24 May 2011
First review comments and user's video for the CV Tools Module
Over half of the first batch of CV Tools have been sold, many in kit form. Here is some feedback from a few kit builders and module users:-
"Finished the CV Tools module. It works as advertised ;) No warts!
I must compliment you on your kit. The packing and organisation of components are as good as I've ever seen. Documentation is on the money for newbies ... All in all, I'm extremely satisfied ..." Steven H (VICMOD)
"...I was really impressed with the documentation and the way everything (in the kit) was bagged/labelled...CV Tools seems like a real Swiss Army Knife. I can already think of countless ways I'll be using it with my Oberheim SEM ... and humble modular." Alex M
"Tinkerbell lives! Tonight I patched a triangle wave LFO into channel 3 of CV Tools and took the slew output into a quantizer (A156) set up to run minor arpeggios. I can control the range of the arpeggiaic ascend/descend and even build in rhythm just using pots 3 & 4 - then out to two VCO's tuned apart. Out through a digital delay and reverb in ProTools and . . . instant magic - fairy dust! What fun . . " George B
Also check out this thread on Muff's entitled Some thoughts on the Synovatron CV Tools
The solution is that the second batch of CV Tools will have a standard screen printed front panel (something like TipTop Audio quality). I will be offering either a very low cost swappout or a low-cost retro-purchase to existing users who would prefer a more conventional graphic - I prefer happy customers over a few extra £. Hopefully you'll come back for more!
Here is the current overlay panel next to the artwork that will be taken to the screen printers (where there is grey it will be the brushed anodised aluminium showing through so it will look a bit better). Any comments, likes and dislikes gratefully received - I will give the artwork to the screen printer in just over a week's time.
Labels:
analog,
analogue,
CV Mixer,
CV Tools,
DIY,
front panel,
Glide,
kit,
Lag,
Mixer,
modular,
module,
Polarity LEDs,
Polarizing Mixer,
Portamento,
Slew Limiter,
synovatron,
Voltage Processor
Subscribe to:
Posts (Atom)